Are you ready to indulge in a sweet and savory treat? This Salted Caramel Apple Dip is simple to whip up and perfect for any gathering. With just a handful of ingredients, including rich brown sugar and smooth cream cheese, you’ll impress your friends and family. I’ll guide you through each step to make this delightful dip. Let’s dive in and satisfy those taste buds with layers of flavor!
Why I Love This Recipe
- Perfect Balance of Flavors: The rich sweetness of the caramel perfectly complements the tartness of the apple slices, creating a delightful contrast that is irresistible.
- Quick and Easy to Make: This dip comes together in just 30 minutes, making it an ideal choice for last-minute gatherings or snack cravings.
- Versatile Serving Options: While it’s fantastic with apple slices, this dip also pairs wonderfully with pretzels, graham crackers, or even drizzled over ice cream.
- Impressive Presentation: With its beautiful marbled effect and glossy caramel drizzle, this dip looks as good as it tastes, making it a showstopper at any event.
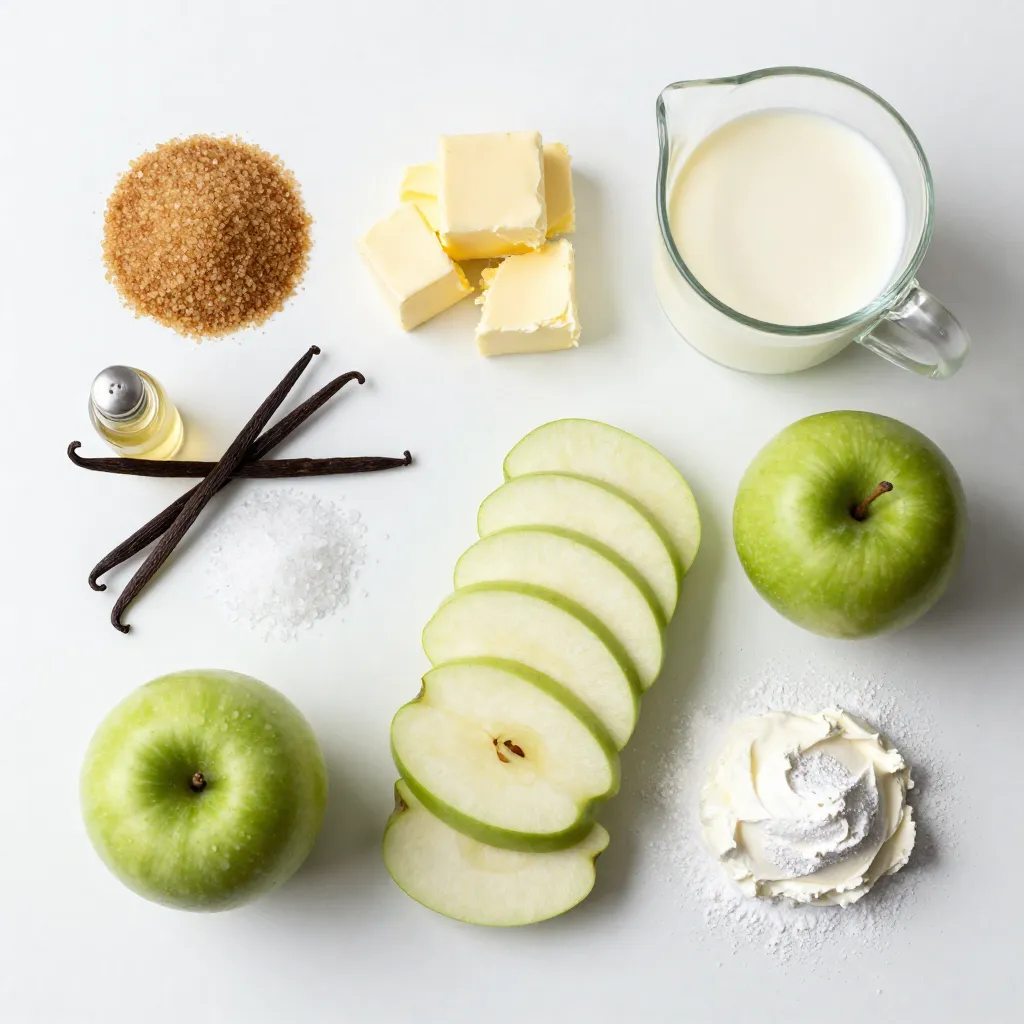
Ingredients
Key Ingredients
– 1 cup brown sugar
– 1/2 cup unsalted butter
– 1/2 cup heavy cream
– 1 teaspoon vanilla extract
– 1/2 teaspoon sea salt
– 4 medium-sized apples (such as Granny Smith or Honeycrisp), sliced
– 1/2 cup cream cheese, softened
– 1 tablespoon powdered sugar
Measurement Breakdown
For this recipe, you will need precise measurements for the best results. You will use:
– 1 cup of brown sugar for sweetness and depth.
– 1/2 cup of unsalted butter to create a rich caramel flavor.
– 1/2 cup of heavy cream for creaminess.
– 1 teaspoon of vanilla extract for warmth.
– 1/2 teaspoon of sea salt to enhance the taste.
– 4 medium-sized apples, ideally Granny Smith or Honeycrisp, for a perfect crunch.
– 1/2 cup of softened cream cheese for a smooth dip.
– 1 tablespoon of powdered sugar to slightly sweeten the cream cheese.
When choosing apples, I recommend using Granny Smith for a tart kick or Honeycrisp for sweetness. These apples hold up well when dipped and add a great balance to the rich caramel flavor.
Step-by-Step Instructions
Preparation of Caramel Sauce
1. Start by taking a medium saucepan. Add 1 cup of brown sugar and 1/2 cup of unsalted butter.
2. Heat this mixture over medium heat. Stir it all the time until it bubbles. This should take about 3 to 5 minutes.
3. Now, carefully add 1/2 cup of heavy cream to the pan. Keep stirring until it is mixed well.
4. Let it boil for 2 to 3 minutes without stirring. You want it to thicken a bit.
5. Once thickened, remove the pan from heat. Stir in 1 teaspoon of vanilla extract and 1/2 teaspoon of sea salt. Set it aside to cool a little.
Creating the Dip Base
1. In a mixing bowl, add 1/2 cup of softened cream cheese and 1 tablespoon of powdered sugar.
2. Use a hand mixer to beat the mix until it is smooth and creamy.
3. Take your cooled caramel sauce and drizzle some over the cream cheese mix.
4. Gently fold it to create a marbled look. Be careful not to mix it too much.
Serving Suggestions
1. Spoon the caramel cream cheese dip into a nice serving bowl.
2. Pour the rest of the salted caramel on top. Drizzle it generously for a pretty look.
3. Serve this dip with sliced apples. I love using Granny Smith or Honeycrisp apples for their crispness.
4. Arrange the apple slices around the bowl. It makes for a great presentation.
Tips & Tricks
Perfecting the Caramel
To make great caramel, you need the right consistency. Start by cooking the brown sugar and butter together. Stir them for about three to five minutes until the sugar melts. You’ll see bubbles form. This step is key!
After that, add the heavy cream. Keep stirring as you do this. Let it boil for two to three minutes without stirring. This helps it thicken. You want it to coat the back of a spoon.
Enhancing Flavor and Texture
Adding spices makes your dip more special. Try a pinch of cinnamon or nutmeg for warmth. It adds depth to the flavor.
For a smooth dip base, make sure your cream cheese is soft. Let it sit at room temperature for at least 30 minutes. Mix it well with powdered sugar until it’s creamy. This will help create the perfect texture.
Common Mistakes to Avoid
Don’t skip the cooling time! Let the caramel cool for about ten minutes before mixing. This prevents the cream cheese from melting.
Also, be careful not to overcook the caramel. If you let it cook too long, it becomes hard. You want a nice, pourable consistency. Keep an eye on it to get it just right!
Pro Tips
- Choose the Right Apples: For the best flavor combination, use a mix of tart and sweet apples like Granny Smith and Honeycrisp.
- Control the Caramel Texture: Boil the caramel for longer if you prefer a thicker consistency, but keep an eye on it to prevent burning.
- Cool Before Mixing: Let the caramel cool slightly before drizzling it into the cream cheese to maintain its structure and prevent separation.
- Presentation Matters: For a beautiful presentation, drizzle extra caramel on top and garnish with a sprinkle of sea salt or crushed nuts.
Variations
Ingredient Swaps
You can change the cheese and sweetener in the dip. For a creamier texture, try mascarpone cheese instead of cream cheese. If you want it sweeter, use maple syrup or honey.
Toppings can also add fun! Try mixing in crushed nuts like pecans or walnuts to add crunch. You can also drizzle melted chocolate over the top.
Flavor Additions
Seasonal flavors can make this dip special. In fall, add pumpkin spice for a warm, cozy taste. For summer, a hint of lemon zest can brighten the dip.
You can also add other dippables besides apples. Try sliced pears or fresh strawberries. These fruits pair well with the sweet and salty mix.
Dietary Modifications
If you need gluten-free options, this dip is naturally safe. All the ingredients are gluten-free.
For a vegan version, swap the cream cheese for a nut-based cheese. Use coconut cream instead of heavy cream for a rich, creamy taste. You can also use agave nectar in place of brown sugar.
Storage Info
Refrigeration Tips
To store leftovers, place the dip in an airtight container. Cover it well to keep moisture out. You want the dip to stay fresh and tasty. Use containers made from glass or plastic. Glass is better for flavor, but plastic works too. Make sure to chill it right away. This helps keep it from spoiling.
Freezing Instructions
You can freeze the dip, but it may change texture. If you want to freeze it, use a freezer-safe container. Leave some space at the top for expansion. To thaw, move it to the fridge overnight. This helps keep the taste and texture. Avoid microwaving it, as it can separate.
Shelf Life
In the fridge, the dip stays fresh for about a week. Look for signs of spoilage, like a sour smell or change in color. If you see any mold, throw it away right away. Always trust your senses! If it doesn’t smell or look right, it’s better to be safe.
FAQs
How do I make the caramel less sticky?
To make the caramel less sticky, cook it a bit longer. The longer you boil it, the thicker it gets. Just be careful not to burn it. Stir often while it’s cooking. This will help keep the sugar from getting too sticky. You can also add a bit more cream to help.
Can I use store-bought caramel sauce instead?
Yes, you can use store-bought caramel sauce. It saves time and is easy to find. Just warm it up a little before serving. This will make it smoother for dipping. However, homemade caramel has a richer taste. If you have time, I recommend making it from scratch.
What other fruits can I serve with this dip?
Besides apples, you can serve pears, bananas, or strawberries. These fruits pair well with the caramel dip. You can even try grapes or pineapple for a fun twist. The sweet and salty dip works great with many fruits.
How long can I keep the salted caramel apple dip?
You can keep the dip in the fridge for about three days. Make sure to store it in an airtight container. If you notice any change in color or smell, it’s best to throw it away. Enjoy it fresh for the best taste!
This blog post covered the key ingredients, preparation steps, serving tips, and storage for the salted caramel apple dip. You learned how to create a tasty treat using simple items like brown sugar, apples, and cream cheese. Remember, each step matters in making the dip rich and flavorful. Whether you try variations or stick to the basics, enjoy the fun of dipping. I hope you create delicious moments with this recipe. Your next gathering will shine with this dip at the cente