Are you ready to impress your family with a quick and tasty dinner? This Parmesan Crusted Tilapia recipe is not only easy to make, but it bursts with flavor. You can whip up this dish in no time, using fresh, simple ingredients. I’ll guide you through each step, sharing tips for the perfect crust and delicious variations. Let’s dive into the mouth-watering world of tilapia!
Why I Love This Recipe
- Easy to Prepare: This recipe is straightforward and quick, making it perfect for busy weeknights.
- Crispy Texture: The combination of Parmesan cheese and panko breadcrumbs creates a deliciously crispy crust.
- Flavorful: The garlic and onion powder add a rich flavor that complements the tilapia beautifully.
- Versatile: Serve with a variety of sides or toppings, such as lemon wedges or fresh herbs, for a delightful meal.
Ingredients
List of Required Ingredients
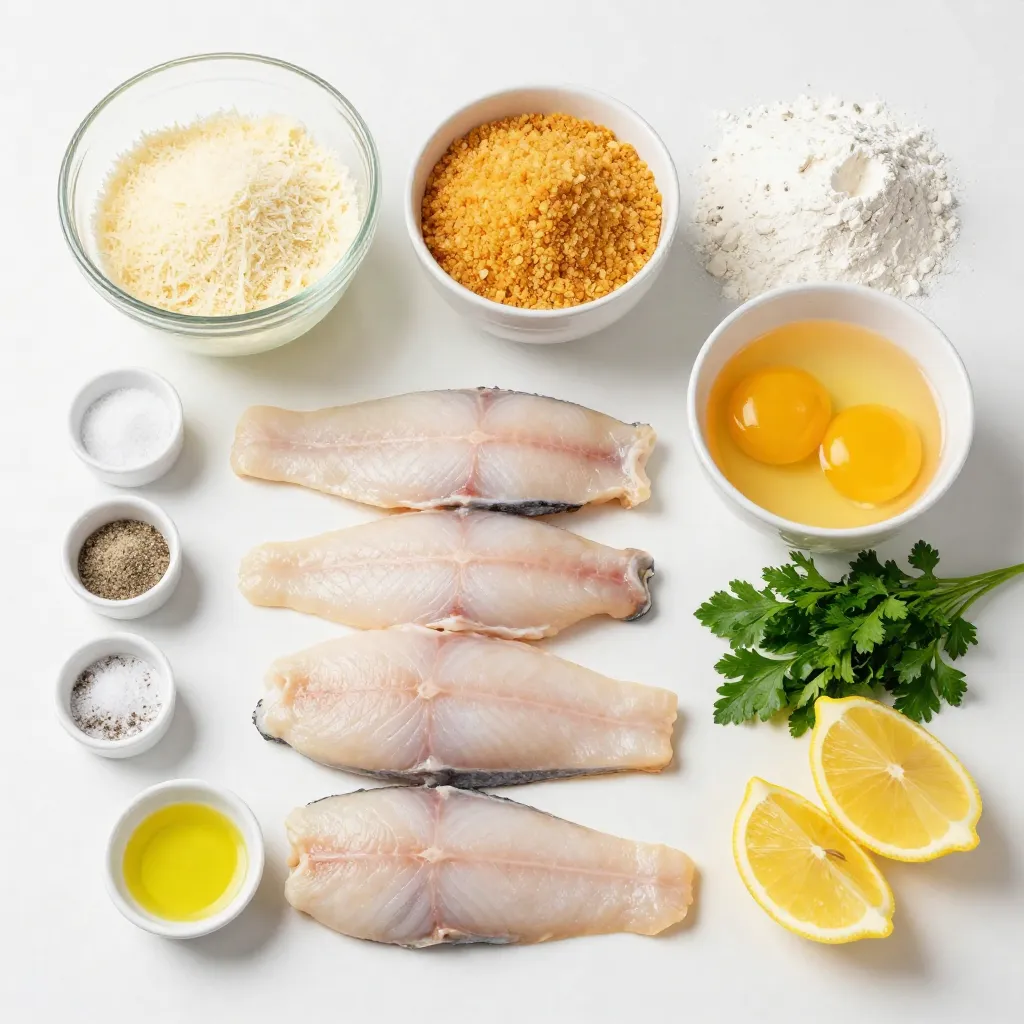
To make Parmesan crusted tilapia, gather these ingredients:
– 4 tilapia fillets
– 1 cup grated Parmesan cheese
– 1 cup panko breadcrumbs
– 2 tablespoons all-purpose flour
– 2 eggs, beaten
– 2 tablespoons fresh parsley, chopped
– 1 teaspoon garlic powder
– 1 teaspoon onion powder
– 1/2 teaspoon salt
– 1/2 teaspoon black pepper
– 3 tablespoons olive oil for frying
– Lemon wedges for serving
Notes on Ingredient Quality
Using fresh ingredients makes a big difference in flavor. Choose tilapia fillets that smell fresh and have firm flesh. Look for high-quality Parmesan cheese, as it adds rich taste. I prefer to use panko breadcrumbs for a crispier texture. Fresh parsley gives a nice touch of color and flavor. Always check the expiration dates on your ingredients for the best results.
Possible Substitutions
You can swap tilapia with other fish like cod or haddock. If you want a dairy-free option, use nutritional yeast instead of Parmesan. For a gluten-free version, use almond flour or gluten-free breadcrumbs. You can also use dried herbs like thyme or oregano if you don’t have parsley.
Step-by-Step Instructions
Preparation of Dredging Stations
To start, set up your dredging stations. You need three shallow bowls. In the first bowl, add 2 tablespoons of all-purpose flour. This helps the egg stick to the fish. In the second bowl, beat 2 eggs until smooth. This will add moisture and help the crust stick. In the last bowl, mix 1 cup of grated Parmesan cheese and 1 cup of panko breadcrumbs. Add 1 teaspoon of garlic powder, 1 teaspoon of onion powder, 1/2 teaspoon of salt, and 1/2 teaspoon of black pepper. Stir this mix well to blend the flavors.
Coating the Tilapia Fillets
Now, take your tilapia fillets. Coat each fillet in the flour first. Shake off any extra flour. Next, dip the fillet into the beaten eggs. Let the excess egg drip off. Then, press the fillet into the Parmesan and breadcrumb mix. Ensure both sides are well-coated. This step is key for that crispy crust you want.
Cooking the Fillets to Perfection
In a large skillet, heat 3 tablespoons of olive oil over medium-high heat. To check if the oil is ready, flick a tiny bit of water into the pan. If it sizzles, it’s hot enough. Carefully add the coated tilapia fillets to the oil. Fry them for about 3-4 minutes on each side. You want the crust to turn golden brown. The fish should flake easily with a fork. If your skillet is small, fry in batches to avoid crowding. Once done, place the fillets on a plate lined with paper towels. This helps absorb any extra oil. Enjoy your crispy tilapia with a sprinkle of fresh parsley and lemon wedges on the side!
Tips & Tricks
Achieving the Perfect Crust
To get that crispy crust, use fresh Parmesan cheese. Grate it yourself for the best flavor. Mix the cheese with panko breadcrumbs. This blend gives you a light, crunchy texture. Press the fish firmly into this mix. Make sure both sides are coated well. This ensures a great crust that sticks during cooking.
Cooking Techniques for Even Frying
Heat your oil well before adding the fish. A good test is to flick water into the pan. If it sizzles, the oil is hot enough. Fry the fillets in small batches. This prevents overcrowding and helps them cook evenly. Turn the fish gently to avoid breaking the crust. Cook until each side is golden brown and flaky.
Enhancing Flavor with Seasoning
Season your breading mix for extra taste. Add garlic powder and onion powder to boost the flavor. A bit of salt and black pepper enhances all the ingredients. Fresh parsley adds a nice touch too. For a zesty kick, serve with lemon wedges. Squeeze them over the fish just before eating. This adds a bright flavor that pairs well with the rich crust.
Pro Tips
- Use Fresh Ingredients: Always opt for fresh tilapia fillets for the best flavor and texture. Frozen tilapia can work in a pinch, but fresh is always preferred.
- Perfect the Frying Temperature: Make sure the oil is hot enough before adding the fish. This helps achieve a crispy crust without making the fish greasy.
- Don’t Overcrowd the Pan: Fry the tilapia in batches if necessary. Overcrowding can lower the oil temperature, resulting in soggy fish instead of crispy crust.
- Experiment with Seasonings: Feel free to add your favorite spices or herbs to the breadcrumb mixture for a personalized flavor boost. Paprika or Italian seasoning can be great additions!
Variations
Alternative Coatings for Tilapia
You can change the coating for your tilapia to mix things up. Instead of using panko, try crushed cornflakes. They add a nice crunch. You could also use crushed nuts, like almonds or pecans, for a unique flavor. For a spicy twist, add cayenne pepper to the breadcrumb mix. This gives the fish a nice kick.
Serving Suggestions and Side Dishes
Pair your Parmesan crusted tilapia with tasty sides. A fresh green salad works well. You can add cherry tomatoes, cucumbers, and a light vinaigrette. Roasted vegetables, like broccoli or carrots, bring color and flavor. Garlic mashed potatoes are also a classic choice. They soak up any juices from the fish. For a bright touch, serve lemon wedges on the side. They add brightness with every squeeze.
Making it Gluten-Free
To make this dish gluten-free, swap out the all-purpose flour and panko breadcrumbs. Use a gluten-free flour blend and gluten-free breadcrumbs instead. Many brands make these now. Check the label to be sure. You’ll still get that crispy texture and great taste!
Storage Info
How to Store Leftover Tilapia
To store leftover tilapia, first let it cool. Place the fish in an airtight container. Cover it well to keep moisture in and air out. Store the container in the fridge. Leftover tilapia lasts for about 2 to 3 days. Make sure to label the container with the date. This helps you keep track of freshness.
Reheating Tips for Best Results
When reheating your tilapia, use the oven for the best texture. Preheat the oven to 350°F (175°C). Place the fish on a baking sheet. Cover it with foil to keep it moist. Heat for about 10-15 minutes. Check that it is warmed through. You can also use a skillet. Heat a little olive oil in the pan. Add the tilapia and warm it on low heat for about 5 minutes.
Freezing for Future Meals
To freeze tilapia, wrap it tightly in plastic wrap. Then place it in a freezer bag. Make sure to press out any air before sealing. Properly stored, it can last for up to 3 months in the freezer. When ready to eat, thaw it in the fridge overnight. This will help keep its flavor and texture.
FAQs
What can I substitute for tilapia?
You can use other mild fish. Good choices are cod, haddock, or catfish. These fish will still taste great with the Parmesan crust. They cook similarly to tilapia, so you can use the same method. Always check for freshness when you choose fish.
How do I know when the fish is done?
The fish is done when it flakes easily with a fork. The outside should be golden brown. You can also use a food thermometer. The fish should reach 145°F (63°C). If you see the flesh turning opaque, it’s close to being ready.
Can I bake instead of fry the tilapia?
Yes, you can bake the tilapia if you prefer. Preheat your oven to 400°F (200°C). Place the coated fillets on a baking sheet lined with parchment paper. Bake for about 15-20 minutes. You may want to spray the fillets with cooking oil for added crispiness. This method is healthier and just as tasty!
This article covered all you need for making tilapia at home. We discussed key ingredients, including substitutes for your pantry. You learned precise steps for dredging and cooking the fillets perfectly. I shared tips for a great crust and even frying. We explored tasty variations and ways to store leftovers.
Remember, simple changes can boost your dish. Keep experimenting and enjoy your cookin