Are you ready to whip up a delicious Japanese Chicken Katsu? This simple meal is crispy, tasty, and sure to impress. I’ll guide you through the easy steps, from preparing the chicken to achieving that perfect crunch. Plus, I’ll share tips to keep your Katsu crispy and variations to please everyone at the table. Let’s dive into this delightful dish together!
Why I Love This Recipe
- Easy to Prepare: This recipe requires minimal ingredients and straightforward steps, making it perfect for a weeknight dinner.
- Crispy Texture: The panko bread crumbs provide an irresistible crunch that contrasts beautifully with the tender chicken.
- Versatile Dish: Chicken katsu can be served in various ways – as a main dish, in sandwiches, or atop rice for a delicious meal.
- Flavorful Sauce: The tonkatsu sauce adds a rich, tangy flavor that elevates the dish, making it a crowd-pleaser.
Ingredients
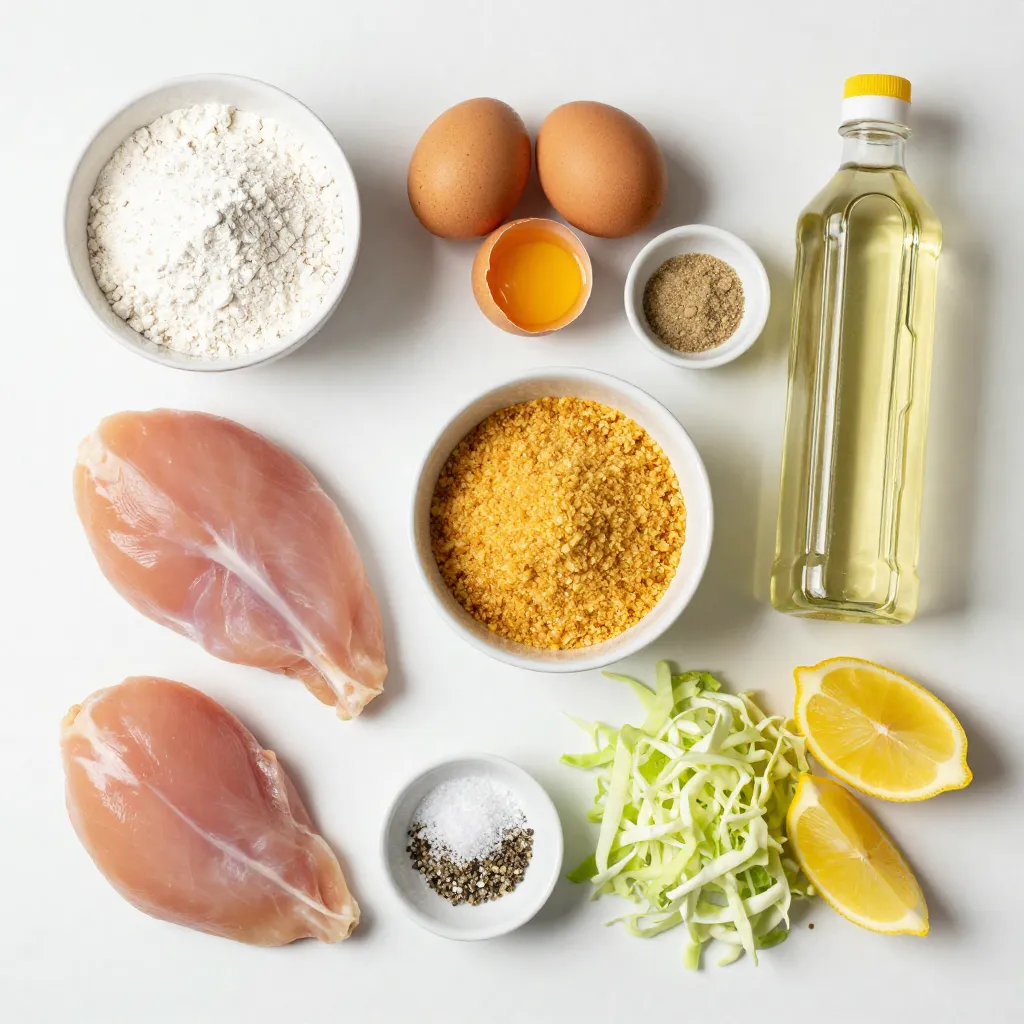
Complete list of ingredients
– Chicken
– 2 boneless chicken breasts
– Breading components
– 1 cup all-purpose flour
– 2 large eggs
– 1 cup panko bread crumbs
– Seasoning and condiments
– Salt and pepper to taste
– 1 teaspoon garlic powder
– 1 teaspoon onion powder
– Vegetable oil for frying
– Tonkatsu sauce (for serving)
– Optional serving suggestions
– Shredded cabbage
– Lemon wedges for garnish
Gathering these ingredients makes the cooking process smooth and fun. The chicken breasts need to be fresh and boneless for the best flavor. Panko bread crumbs give the katsu its signature crunch. Seasoning the chicken adds depth to each bite. You can adjust the salt and pepper to your taste. Don’t skip the tonkatsu sauce; it provides a sweet and tangy finish. Shredded cabbage adds a nice crunch, while lemon wedges brighten the dish. This simple list is all you need to create a delightful meal that impresses!
Step-by-Step Instructions
Preparing the Chicken
First, we need to butterfly and pound the chicken. Place each chicken breast between two sheets of plastic wrap. Use a meat mallet or rolling pin to pound them to an even thickness of about ½ inch. This step helps the chicken cook evenly and stay tender.
Next, it’s time to season the chicken. Sprinkle salt, pepper, garlic powder, and onion powder on both sides. This adds flavor and makes the dish even better.
Breading Process
Now let’s set up the breading station. Grab three shallow dishes. In the first dish, add the flour. In the second dish, beat the eggs. In the third dish, place the panko bread crumbs. This setup makes breading easy.
To bread the chicken, dredge each piece in the flour first. Shake off any extra flour. Then dip the chicken into the beaten eggs, letting any excess drip off. Finally, coat the chicken with panko bread crumbs. Press down gently to make sure the crumbs stick well.
Cooking the Chicken
For cooking, heat about ½ inch of vegetable oil in a large skillet over medium heat. Once the oil is hot, carefully place the breaded chicken breasts in the skillet. Cook them for about 4-5 minutes on each side. You want them golden brown and fully cooked. Use a meat thermometer to check that they reach an internal temperature of 165°F (75°C).
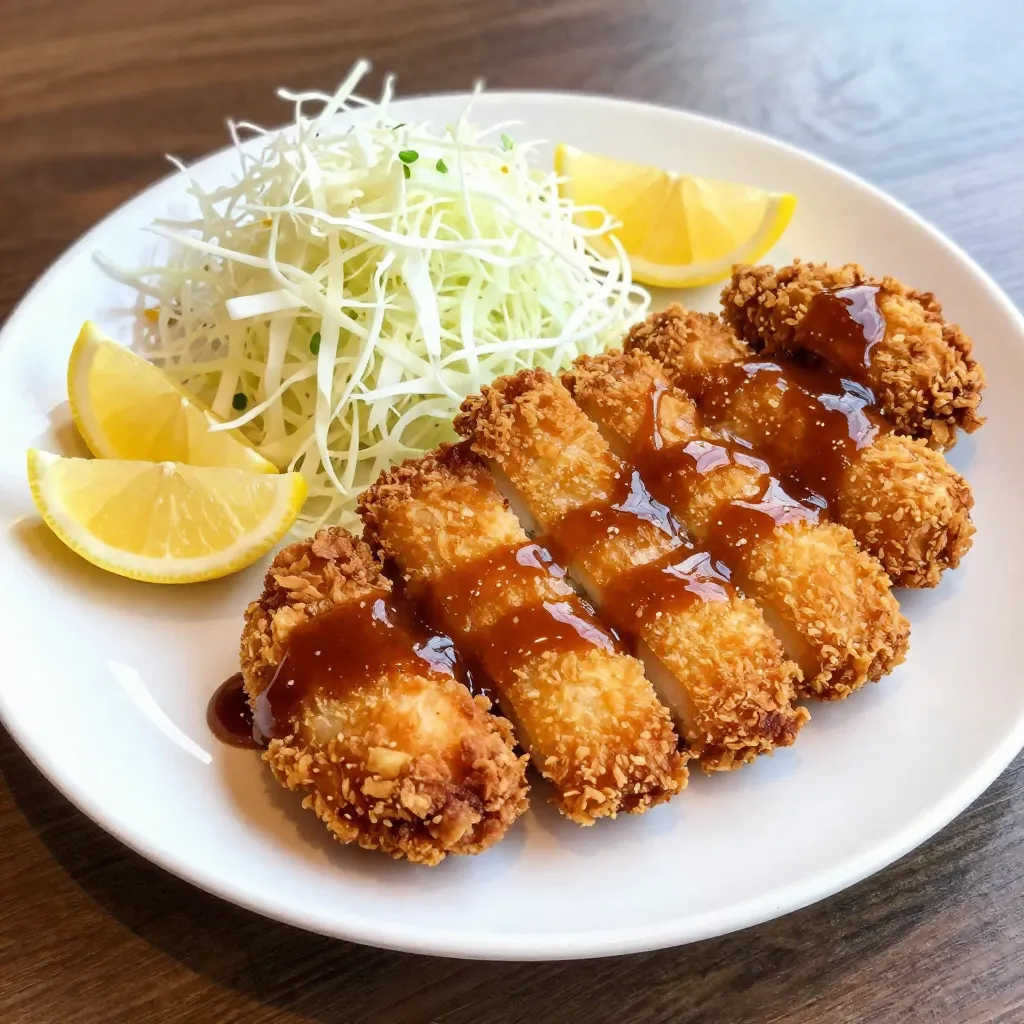
Once they are done, move the chicken katsu to a plate lined with paper towels. This helps drain any excess oil. Now, slice the chicken into strips. Serve it hot, drizzled with tonkatsu sauce and alongside shredded cabbage. Add lemon wedges for a refreshing touch. Enjoy your delicious chicken katsu!
Tips & Tricks
Cooking techniques for perfect texture
– Using a meat mallet: I love using a meat mallet to pound the chicken. This step helps make the chicken tender and ensures it cooks evenly. When you pound the chicken to about ½ inch thick, you get a great result. It cooks faster and stays juicy.
– Oil temperature tips: The oil temperature is key. Heat the oil over medium heat. You want it hot enough to sizzle when you add the chicken. If it’s too cold, the chicken absorbs too much oil. If it’s too hot, you risk burning the coating. A good tip is to use a small piece of bread to check. If it browns in about 60 seconds, the oil is ready.
Keeping the coating crispy
– Drain excess oil properly: After frying, place the chicken on a paper towel-lined plate. This helps soak up any extra oil. If you leave it sitting in the oil, the coating can get soggy.
– Serving suggestions to maintain crispness: Serve your chicken katsu right away for the best texture. Pair it with shredded cabbage and drizzle tonkatsu sauce on top. The crunch of the cabbage complements the crispy chicken. For an extra touch, add lemon wedges for a bright flavor.
Pro Tips
- Butterfly for Even Cooking: Butterflying the chicken breasts helps them cook evenly and stay tender, resulting in a perfect texture.
- Use Panko for Extra Crunch: Panko bread crumbs provide a lighter, crunchier coating than regular bread crumbs, elevating the dish’s texture.
- Temperature Check: Always use a meat thermometer to ensure the chicken reaches an internal temperature of 165°F (75°C) for safety and optimal juiciness.
- Rest Before Slicing: Allow the cooked chicken katsu to rest for a few minutes before slicing; this helps retain its juices and keeps it moist.
Variations
Different protein options
You can switch up the protein in Chicken Katsu.
– Using pork for Katsu: Pork loin is a great choice. It has a nice flavor and stays juicy. Just follow the same steps as chicken. Pound it thin, season, and bread it. Fry until golden.
– Vegetarian alternatives: For a meatless option, try eggplant or tofu. Slice the eggplant into thick rounds. For tofu, use firm tofu and press it to remove moisture. Bread and fry them just like chicken. Both are delicious and filling.
Sauces and sides
Katsu is great with various sauces and sides.
– Alternate sauces to use: While tonkatsu sauce is classic, you can try BBQ sauce or sweet chili sauce. Each adds a unique flavor twist to your meal. Just drizzle it over the chicken for a tasty change.
– Traditional accompaniments: Serve Chicken Katsu with shredded cabbage for crunch. You can also add rice or miso soup for a full meal. Lemon wedges are nice for a fresh touch. They brighten up the dish and add zest.
Storage Info
Storing leftovers
To keep your Chicken Katsu fresh, wrap it well. Use plastic wrap or aluminum foil. Store it in the fridge for up to three days. This helps to maintain its flavor and texture. If you want to save it longer, consider freezing. Place the chicken in a freezer bag. Remove as much air as possible. It can stay good for up to three months.
Reheating instructions
To reheat Chicken Katsu, use an oven for the best results. Preheat your oven to 375°F (190°C). Place the chicken on a baking sheet. Bake for about 10-15 minutes until it’s hot. For extra crispiness, you can use an air fryer. Set it to 350°F (175°C) for about 5-7 minutes. This keeps the coating crunchy and delicious. Avoid using a microwave as it can make the chicken soggy.
FAQs
What is Japanese Chicken Katsu?
Japanese Chicken Katsu is a delicious fried chicken dish. It comes from Japan and means “cutlet.” The dish features chicken that is tender and crispy. You prepare it by breading chicken breasts in panko crumbs. The result is a crunchy outer layer with juicy meat inside. This dish has roots in Western-style cooking, brought to Japan in the late 19th century. It quickly became a favorite in Japanese homes and restaurants.
Can I make Chicken Katsu ahead of time?
Yes, you can prepare Chicken Katsu ahead of time. You can season and bread the chicken earlier in the day. Just keep it in the fridge until you’re ready to cook. This saves time when you want to serve it fresh. If you want to store it longer, freeze the breaded chicken. When ready, just fry it straight from the freezer. This helps keep the katsu crispy.
What should I serve with Chicken Katsu?
Chicken Katsu pairs well with many side dishes. Here are some great options:
– Shredded cabbage for crunch
– Steamed rice for a filling meal
– Miso soup for a warm starter
– Pickled vegetables for a tangy taste
– Tonkatsu sauce for dipping
You can also enjoy it with a cold drink like green tea or a light beer. These sides balance the flavors and add to your meal experience.
In this post, I shared the secrets to making delicious Chicken Katsu. We covered ingredients, cooking tips, and variations. You learned how to butterfly, season, and bread chicken for the best taste. Plus, I provided storage info and answers to common questions.
Now, it’s your turn to try this dish at home. Enjoy your crispy, golden Chicken Katsu with your favorite sides. Don’t forget to have fun while cookin