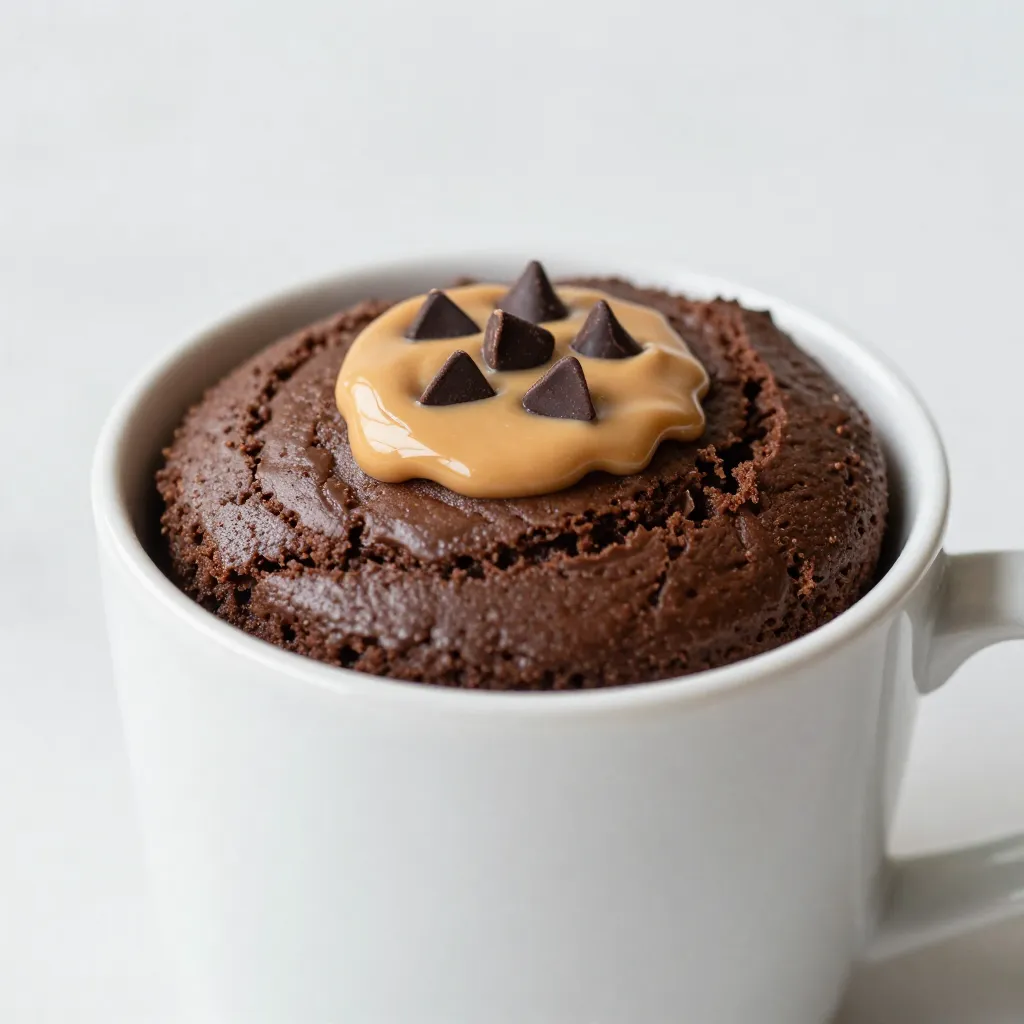
Craving something sweet and easy? A Chocolate Peanut Butter Mug Cake is your ideal dessert! In just a few minutes and with simple ingredients, you can indulge in a warm, rich treat that perfectly blends chocolate and peanut butter. Whether you’re a busy adult or a kid with a sweet tooth, this quick recipe will satisfy your cravings. Let’s dive into making this delicious delight!
Why I Love This Recipe
- Quick and Easy: This mug cake takes just a few minutes to prepare and cook, making it a perfect last-minute dessert.
- Decadent Flavor: The combination of chocolate and peanut butter creates a rich and indulgent treat that satisfies any sweet tooth.
- Single Serving: No need to bake a whole cake; this recipe is designed for one, perfect for those solo cravings.
- Customizable: Easily add extras like chocolate chips or toppings to make it uniquely yours!
Ingredients
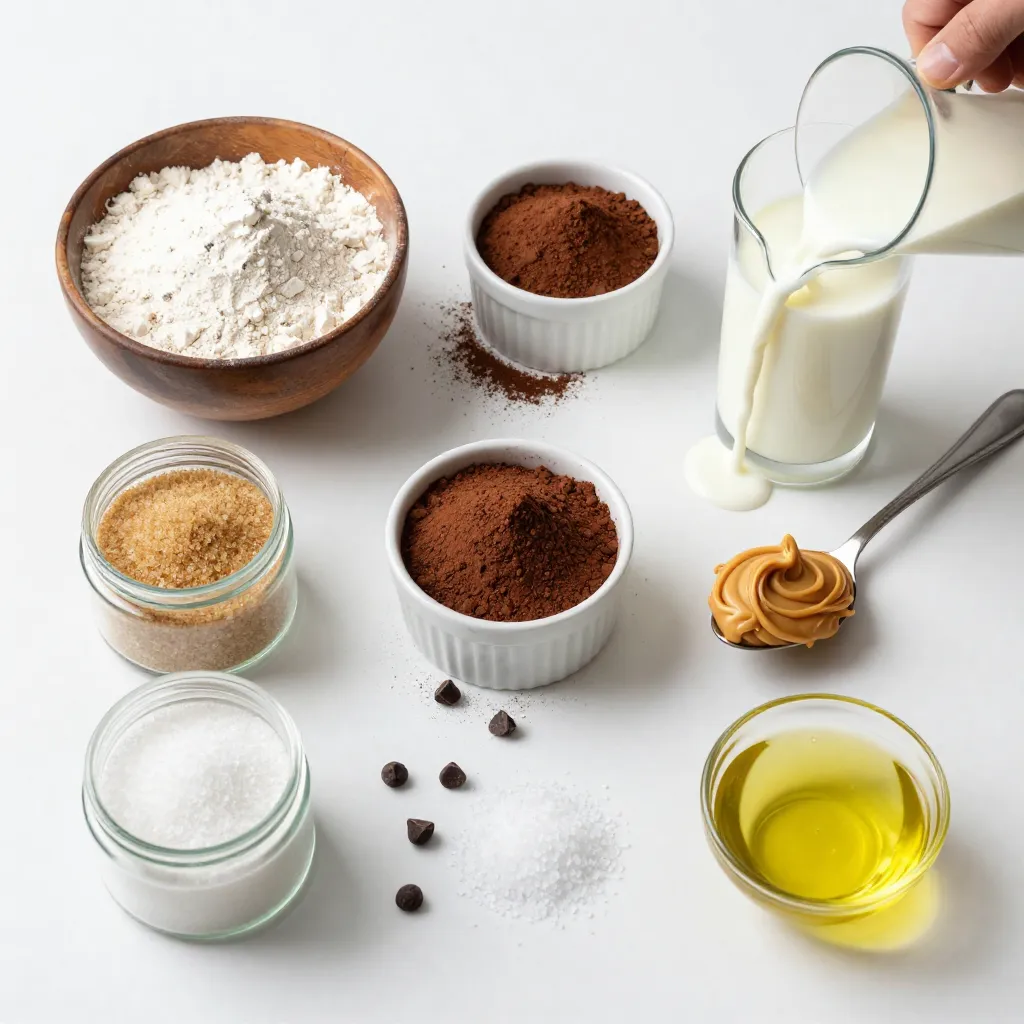
List of Ingredients
– 4 tablespoons all-purpose flour
– 2 tablespoons cocoa powder
– 1/4 teaspoon baking powder
– 4 tablespoons milk (or dairy-free alternative)
– 2 tablespoons peanut butter
– 2 tablespoons sugar (brown or granulated)
– 1 tablespoon vegetable oil
– A pinch of salt
– Optional: Chocolate chips for added richness
When I make a chocolate peanut butter mug cake, I love how simple the ingredients are. You need just a few key items to whip up this treat. First, all-purpose flour gives the cake its structure. Cocoa powder adds a rich chocolate flavor. The baking powder helps it rise nicely in the microwave.
Next, you can choose milk or a dairy-free alternative. This adds moisture to the cake. Peanut butter brings that creamy, nutty flavor we all love. Sugar, either brown or granulated, sweetens the cake. Vegetable oil keeps it soft and moist. A tiny pinch of salt balances all the flavors beautifully.
If you want to take it a step further, chocolate chips are a great optional addition. They melt into the cake and make it extra gooey and delicious. This mix of ingredients creates a quick dessert that satisfies your sweet tooth. It’s perfect for a late-night craving or a fun treat anytime!
Step-by-Step Instructions
Preparation of Dry Ingredients
To start, grab a microwave-safe mug. First, add 4 tablespoons of all-purpose flour. Next, mix in 2 tablespoons of cocoa powder. Then, add 1/4 teaspoon of baking powder and a pinch of salt. Stir these dry ingredients well. You want to remove any lumps to ensure a smooth texture.
Mixing Wet Ingredients
Now, it’s time for the wet ingredients. Add 2 tablespoons of sugar to the dry mix. You can use brown or granulated sugar based on your taste. Next, pour in 4 tablespoons of milk or a dairy-free option. Add 1 tablespoon of vegetable oil and 2 tablespoons of peanut butter. Stir vigorously until you achieve a smooth mixture. Make sure the peanut butter is well blended.
Cooking the Mug Cake
Microwave the mug cake on high for 1 minute and 30 seconds. Cooking times may vary based on your microwave’s wattage. If it’s not done, add more time in 15-second increments. Be cautious when removing the mug; it will be hot! Let it cool slightly before enjoying your delicious creation.
Tips & Tricks
Perfecting the Mug Cake Texture
To get a great mug cake texture, you need the right mix. The batter should be smooth and creamy. Make sure to mix well until there are no lumps. If it feels too thick, add a splash more milk.
Microwave wattage can change cooking times. Most microwaves need about 1 minute and 30 seconds. If your mug cake isn’t set, add 15 seconds more. Keep an eye on it. You don’t want it to overflow or dry out.
Creative Serving Suggestions
Serving your mug cake can be fun! You can eat it straight from the mug or transfer it to a plate. For a special treat, add a scoop of vanilla ice cream on top. Whipped cream also works wonders. Drizzle some melted chocolate or extra peanut butter over it for a sweet finish.
Common Mistakes to Avoid
Avoid overmixing your batter. It can make the mug cake dense and tough. Stir just until everything is combined. Also, be careful not to undercook your cake. If it’s too gooey, it might not taste good. Always check for a firm top before taking it out of the microwave.
Pro Tips
- Use a Larger Mug: To prevent overflow, choose a mug that is at least 12 ounces in size.
- Experiment with Sweeteners: Feel free to substitute honey or maple syrup for sugar for a different flavor profile.
- Check Microwave Wattage: Since microwaves vary in power, adjust cooking time accordingly to achieve the perfect texture.
- Let it Cool: Allow the cake to cool for a couple of minutes before eating to enhance the flavor and prevent burns.
Variations
Flavor Adaptations
You can change the nut butter in this mug cake. Almond butter or cashew butter work great. Each nut butter adds a unique taste. If you want more sweetness, try using honey or agave. These options make the cake even more delicious.
Add-ins for Extra Flavor
Want to make your mug cake special? Add some nuts or fruits. Chopped walnuts give a nice crunch. You can also use berries for a fruity twist. Spices like cinnamon or vanilla can add warmth and depth. Just mix them in for extra flavor.
Dietary Modifications
If you need gluten-free options, use gluten-free flour instead of regular flour. This keeps the cake yummy and safe for those who avoid gluten. For vegan substitutions, swap out milk for a plant-based milk. Use maple syrup instead of sugar for a vegan-friendly treat. These swaps let everyone enjoy this dessert!
Storage Info
Storing Leftovers
To keep your mug cake fresh, let it cool first. Transfer it to an airtight container. Store it in the fridge for up to two days. This helps maintain its soft texture. Avoid leaving it out, as it can dry out quickly.
Reheating Tips
When reheating, use the microwave. Place the mug cake in the microwave for about 10-15 seconds. Check it often to avoid drying it out. If it feels dry, add a splash of milk to revive its moistness. Stir it gently before heating again to ensure even warmth.
Freezing Options
Yes, you can freeze the mug cake! Wrap it tightly in plastic wrap or foil. Place it in a freezer bag. It can last up to one month in the freezer. To enjoy, thaw it in the fridge overnight, then reheat as needed. This keeps the flavors intact and ready for a quick treat!
FAQs
How do I make a mug cake without a microwave?
You can bake a mug cake in your oven. Preheat your oven to 350°F (175°C). Use an oven-safe mug or small ramekin. Mix your ingredients just like in the microwave method. Pour the batter into the mug. Place it on a baking sheet for support. Bake for 15 to 20 minutes. Check for doneness with a toothpick. If it comes out clean, it’s ready. Adjust the time based on your oven’s power. This method gives you a nice texture, similar to regular cakes.
Can I double the recipe for multiple servings?
Yes, you can double or even triple the recipe. Just use a larger bowl for mixing. You can still cook in separate mugs or one big dish. If using one dish, bake it longer. Start with an extra 5 to 10 minutes of bake time. Check with a toothpick for doneness. Keep in mind that larger portions may need more time. This way, you can share this tasty treat with friends or family!
What is the best type of mug to use?
Use a microwave-safe mug for the best results. Look for ceramic or glass mugs. Avoid metal mugs as they can cause sparks. Ensure the mug is large enough to hold the cake while it rises. A 12-ounce mug works well. This size helps prevent overflow. If you want, you can also use a ramekin. Just make sure it’s the right size for your cake!
In this blog post, we covered how to make a delicious mug cake using simple ingredients. You learned about the proper steps, from mixing dry to wet ingredients, and cooking in the microwave. I shared tips to perfect the texture and avoid common mistakes. You can even explore variations and storage options. A mug cake offers a quick treat that fits your taste. Enjoy experimenting with flavors and toppings. You now have the tools to create a tasty dessert anytim