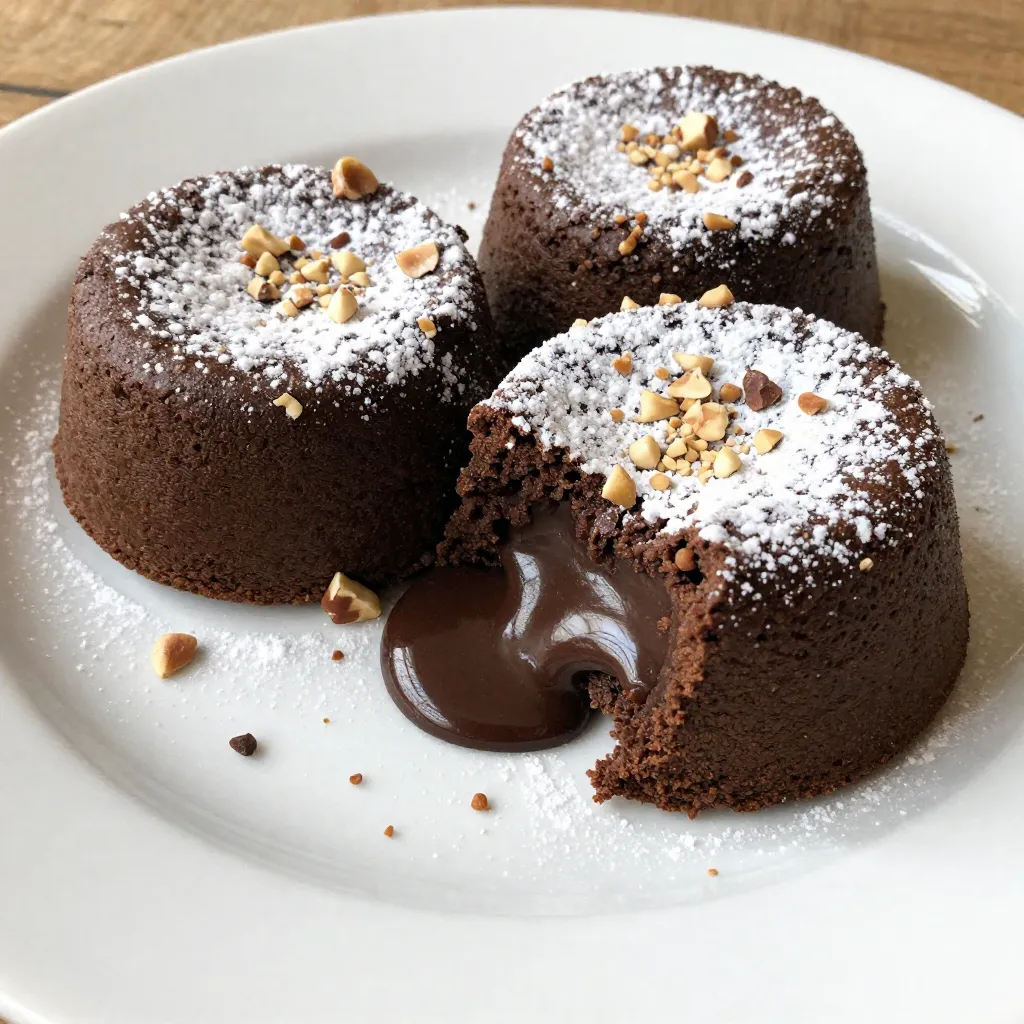
Indulging in a decadent dessert can be pure joy, and Chocolate Hazelnut Lava Cakes are a top choice. Imagine cutting into a warm, gooey cake that oozes rich chocolate goodness. In this guide, I’ll walk you through easy steps to create these delightful treats. From gathering ingredients to serving tips, you’ll learn everything you need to impress your friends and family. Let’s get started on this mouthwatering journey!
Why I Love This Recipe
- Decadent Chocolate Flavor: This recipe delivers a rich and indulgent chocolate taste that melts in your mouth, making it perfect for chocolate lovers.
- Easy to Make: With just a few simple ingredients and quick steps, you can create a gourmet dessert in no time.
- Impressive Presentation: The molten center adds a wow factor, making it an ideal dessert for special occasions or dinner parties.
- Customizable: You can easily swap out the hazelnut spread for other flavors or add different toppings to suit your taste.
Ingredients
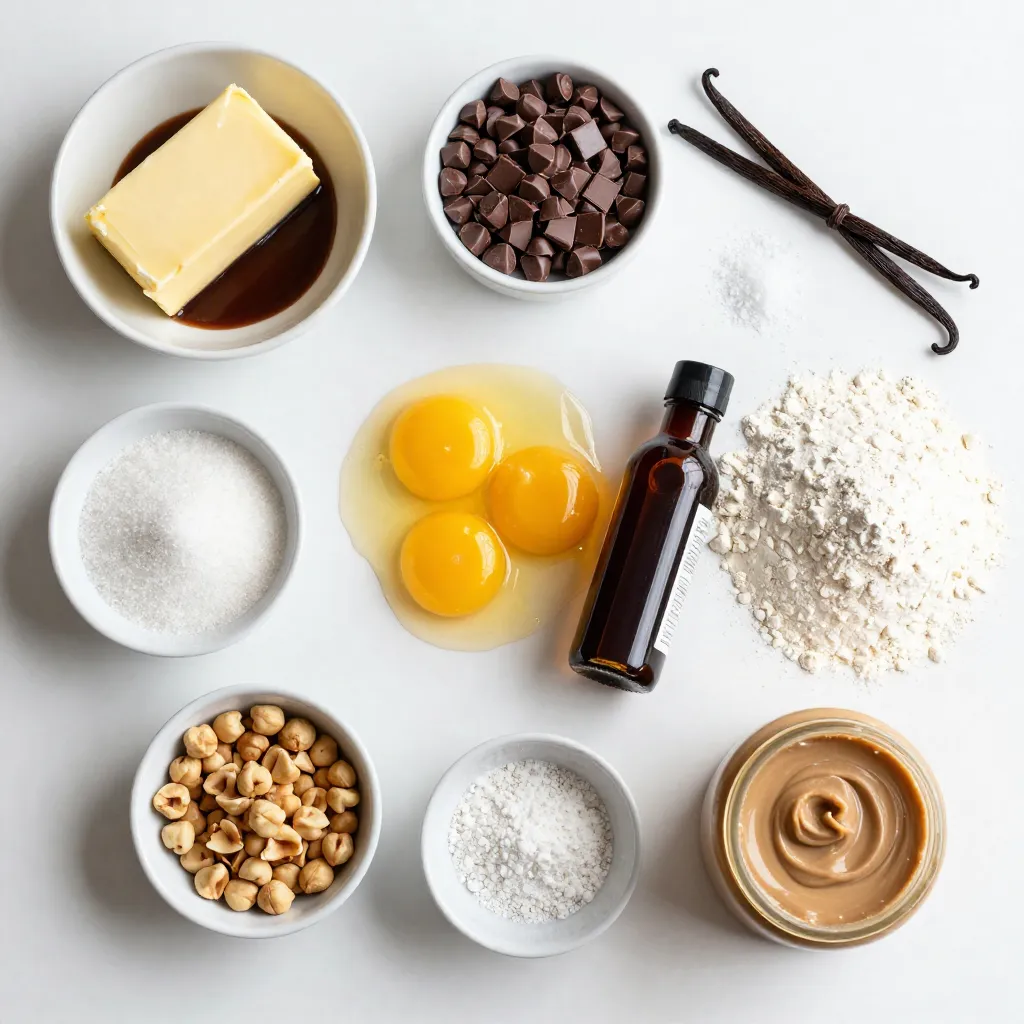
List of ingredients
To make chocolate hazelnut lava cakes, you will need:
– 1/2 cup unsalted butter
– 1 cup bittersweet chocolate chips
– 1/2 cup granulated sugar
– 2 large eggs
– 2 large egg yolks
– 1 teaspoon vanilla extract
– 1/4 cup all-purpose flour
– 1/4 teaspoon salt
– 1/4 cup hazelnut spread (e.g., Nutella)
– 1/4 cup finely chopped hazelnuts (for garnish)
– Powdered sugar (for dusting)
These ingredients create a rich dessert with a gooey center. The bittersweet chocolate gives a deep flavor, while the hazelnut spread adds a lovely twist.
Optional ingredients for variations
You can customize your lava cakes with these optional ingredients:
– Sea salt for a hint of savory flavor
– Espresso powder to enhance the chocolate taste
– Different types of nuts, like almonds or pecans
– Flavored extracts, such as almond or hazelnut
These additions can make each cake unique and more exciting.
Ingredient substitution tips
If you need to swap some ingredients, consider these tips:
– Use coconut oil instead of unsalted butter for a dairy-free option.
– Dark chocolate can replace bittersweet chocolate chips for a richer flavor.
– Maple syrup can stand in for granulated sugar, but reduce the amount slightly.
– Egg substitutes like flaxseed meal or applesauce work for a vegan option.
These substitutions keep the essence of the dish while catering to different needs. Adjusting ingredients can help you enjoy this treat in various ways.
Step-by-Step Instructions
Prepping the ramekins
Start by preheating your oven to 425°F (220°C). This step is key for a perfect bake. Next, take four 6 oz ramekins. Grease each with unsalted butter. Then, dust them lightly with flour. This helps the cakes release easily later. Shake out any extra flour.
Melting the chocolate and butter
In a microwave-safe bowl, add 1/2 cup of unsalted butter and 1 cup of bittersweet chocolate chips. Microwave them together in 30-second bursts. Stir the mixture after each burst. Keep going until it melts and becomes smooth. Let it cool for a bit before mixing in the sugar.
Mixing the batter
Whisk in 1/2 cup of granulated sugar into the melted chocolate mix. Next, add 2 large eggs and 2 egg yolks. Add them one by one, stirring well after each. Then, stir in 1 teaspoon of vanilla extract. Sift in 1/4 cup of all-purpose flour and 1/4 teaspoon of salt. Mix until just combined. Do not overmix, as this keeps the cakes light.
Baking tips for perfect lava cakes
Divide the batter into the prepared ramekins. Fill each about 3/4 full. Now, add a heaping teaspoon of hazelnut spread into the center of each. Gently press it down into the batter. Bake the cakes for about 12 to 14 minutes. The edges should be firm, while the centers stay soft.
Preparing for serving
After baking, let the cakes cool for 1 minute. Use a knife to run around the edges. This helps loosen them. Carefully flip each ramekin onto a dessert plate. Dust with powdered sugar and sprinkle finely chopped hazelnuts on top. Serve these delightful cakes right away for that gooey center.
Tips & Tricks
Ensuring the perfect lava flow
To get that perfect lava flow, you must bake the cakes just right. Bake them for 12 to 14 minutes. The edges should look firm, while the center remains soft and jiggly. This is key for a nice molten center. If you bake them too long, the lava will set. Use an oven thermometer to check your oven’s accuracy.
Common mistakes to avoid
One common mistake is overmixing the batter. Mixing too much can lead to tough cakes. Make sure to mix gently and just until combined. Another mistake is not preparing the ramekins well. Greasing and flouring them helps the cakes release easily. If you skip this step, you may end up with a stuck cake.
How to tell when they are done
To tell if your lava cakes are done, look for the edges. They should be set while the center is soft. You can also gently shake the ramekin. If the center wobbles but the edges are firm, they are ready. Use a toothpick to check, but don’t poke too deep; you want that gooey center!
Pro Tips
- Use Quality Chocolate: The flavor of your lava cakes largely depends on the chocolate you use. Opt for high-quality bittersweet chocolate for a richer taste.
- Don’t Overbake: For the perfect molten center, keep an eye on the baking time. The cakes should be firm on the edges but still soft in the center, typically around 12-14 minutes.
- Cool Before Serving: Let the cakes sit for about a minute after removing them from the oven. This helps them hold their shape better when you invert them onto plates.
- Experiment with Fillings: For a twist, try adding different fillings like caramel or a different nut spread to change up the flavor profile of your lava cakes.
Variations
Alternative nut spreads to use
You can switch hazelnut spread for other nut spreads. Almond butter adds a nice twist. Peanut butter gives a rich taste. Sunflower seed butter works too for nut-free options. Each spread offers a unique flavor and texture. Just remember, use the same amount as hazelnut spread.
Adding different flavor extracts
Want to change the flavor? Try adding different extracts. Almond extract pairs well with chocolate. Orange extract brings a fresh zing. Mint extract offers a cool touch. Just add about half a teaspoon to your batter. This small change can change your dessert’s whole vibe.
Mini baked versions or other sizes
You can bake these in mini ramekins for fun bites. Use smaller ramekins (about 3 oz) and adjust the bake time. They may need only 8-10 minutes. You can also bake in a muffin tin for larger cakes. Just fill each cup halfway and add the filling. Baking time may be slightly longer. Enjoy exploring these variations and make them your own!
Storage Info
Storing leftover lava cakes
After making these chocolate hazelnut lava cakes, you might have some left. To store them, let the cakes cool completely. Place them in an airtight container. They will keep well in the fridge for up to three days. If you want to enjoy them later, don’t forget to cover them well to avoid drying out.
Reheating tips for best results
When you’re ready to enjoy your leftover lava cakes, reheat them gently. Preheat your oven to 350°F (175°C). Place the cakes on a baking sheet. Heat for about 10 minutes. This method warms them through while keeping the centers gooey. You can also use a microwave. Heat each cake for about 20-30 seconds. Keep an eye on them to avoid overcooking.
Freezing instructions and tips
If you want to freeze the lava cakes, it’s easy! First, let them cool completely. Wrap each cake tightly in plastic wrap. Then, place them in a freezer bag. They can stay in the freezer for up to two months. When you want to enjoy them, thaw in the fridge overnight. Then, reheat them as described above for the best taste.
FAQs
How can I make these lava cakes gluten-free?
You can easily make these lava cakes gluten-free by swapping the all-purpose flour. Use a gluten-free flour blend instead. This change works well and keeps the texture just right. Always check the blend’s ingredients to ensure it’s gluten-free.
Can I prepare the batter in advance?
Yes, you can prepare the batter ahead of time. Just mix it and cover it well. Store the batter in the fridge for up to 24 hours. When ready, pour it into ramekins and bake. This saves time for special occasions.
How do I know if the lava cakes are cooked properly?
To check if the cakes are cooked right, look for firm edges and soft centers. The tops should look set but not dry. You can also do the toothpick test. Insert a toothpick into the edge. If it comes out clean, the edges are done. If it’s gooey, the center is perfect!
What to serve with chocolate hazelnut lava cakes?
Serve these lava cakes with a scoop of vanilla ice cream or fresh berries. The cold ice cream pairs well with the warm cake. Whipped cream is also a nice touch. For a bit of crunch, add more chopped hazelnuts on top.
This blog post covered the key steps to make delicious chocolate lava cakes. We discussed ingredients, preparation, and important baking tips. You learned how to ensure that perfect lava flow and avoid common mistakes. Variations and storage tips help you adapt the recipe to your taste.
Enjoy creating your own lava cakes, and don’t hesitate to get creativ